Home » Articles posted by Wesley Barrett
Author Archives: Wesley Barrett
Chimney Repairs You Shouldn’t Ignore
Keeping your chimney in good condition is essential to fire safety, structural integrity and overall home comfort. Chimney repairs typically cost less than replacing the entire chimney and can be done in a variety of ways, from targeted fixes that upgrade fundamental components to full-scale chimney rebuilds.
Water leaks in your chimney are a big red flag and can lead to a host of other issues that compromise masonry integrity, safety and efficiency. Learn 5 common signs that your chimney needs repair to avoid more expensive and extensive damage. Contact Chimney Repair Charleston SC now!
Chimney brick cracks aren’t just cosmetic — they’re a sign of a serious structural foundation issue. These cracks are most likely caused by movement in the soil your home sits on, which can cause chimneys to sink or even detach from the house itself. Because of this, it’s important to have these cracks repaired as soon as you spot them.
Cracks are most often seen around the flue, or at the chimney crown. The chimney crown is a sloping cap at the top of the chimney, and it’s designed to protect the masonry section from water while also preventing the accumulation of ice and snow. However, if the crown is damaged or cracked, moisture can linger in the area, leading to moisture problems and ultimately deteriorating the masonry structure.
If your chimney has a flue liner, cracks or gaps in the lining could lead to dangerous creosote build-up and even fire. Chimney liners can be repaired using a process called tuckpointing, where the old mortar is removed and replaced with fresh material. A specialized concrete fortifier or color additive helps ensure the new mortar matches the rest of your chimney’s brickwork.
While the exact method of repair depends on the cause of the cracks, most of these fixes will include stabilizing your chimney for maximum safety and longevity. Chimneys that aren’t stable can become a health and safety hazard, threatening your family and putting your home at risk of collapse. An expert chimney repair team will know the best method to stabilize your chimney so it can remain strong and safe for years to come. Contact Ohio Basement Authority today to learn more about our chimney repairs and foundation stabilization solutions.
Damaged Crown
The crown protects the chimney from moisture and deterioration but it isn’t impenetrable. In fact, it can be damaged by pounding rain and freezing snow. Over time, the constant freeze thaw cycles can cause cracks in the cement that forms the chimney crown. Once these cracks surface, water can leak inside the chimney, damaging masonry walls and the metal components.
Chimney crowns aren’t easy to repair and it can be dangerous unless you know what you’re doing. A professional chimney sweep can inspect your chimney for crown damage and can recommend the best course of action. If a chimney crown is severely damaged, it may be necessary to have it rebuilt.
If you notice a crack in your chimney crown, it’s important to call a professional right away for inspection. They can determine the extent of the damage and if a chimney sealant will be sufficient or if the crown will need to be rebuilt.
Once the chimney crown has been repaired, you can prevent future problems by applying a chimney crown sealant. Follow the manufacturer’s instructions for application and ensure that it is a product specifically designed for chimney crowns.
Besides sealing cracks, a chimney crown sealant will also help protect the structure from rusting and deteriorating masonry. A rusted firebox or damper is an indicator that moisture has penetrated the chimney and caused damage to the masonry. This type of damage is more expensive to fix than a cracked chimney crown and can even lead to a chimney collapse. By investing in a chimney crown sealant, you can keep the moisture from wreaking havoc on your fireplace and chimney system for a relatively low cost.
Efflorescence
The white staining known as efflorescence is one of the most common chimney issues homeowners experience. This powdery residue can appear on the exterior masonry surfaces of a chimney and is the result of water seeping into bricks and then evaporating on its outer surface. Often, the water that erodes bricks is rain or melting snow, and it can be a sign of an underlying problem like chimney leakage or structural damage.
Efflorescence isn’t dangerous, but it can be unsightly and a clear indication that there is moisture in the chimney structure. A professional chimney technician will examine the structure and look for other signs of moisture problems in addition to the white stains on the bricks. This may include checking for cracks in the masonry and installing a chimney cap to prevent water from entering the chimney.
A reputable chimney company will be able to remove efflorescence with the help of a stiff brush and a special cleaning solution. More severe cases of efflorescence may require sandblasting to fully clean the chimney. Efflorescence that has been left untreated will continue to form, and this can lead to more significant problems like structural damage or mold.
Having a clean and functioning chimney is essential for your safety, as well as the health of your home. If you’re noticing any of these chimney issues, contact your local chimney professionals today. They’ll be able to help you schedule an appointment for a repair that will keep your family safe, and will make sure that your chimney is protected against water damage in the future. Water inside a chimney can cause rot, damage metal components and even lead to the formation of mildew and mold.
Rust
Rust is a red or orange discolored residue that forms when ferrous metals, like those in the chimney cap and damper, mix with oxygen and moisture. Homeowners often see rust on the exterior chimney brick and mortar, chase cover and damper, and even inside their firebox. If this corrosive material isn’t promptly addressed, it will speed up masonry and metal deterioration.
Chimney rust is also a sign that your chimney hasn’t been properly cleaned. A professional chimney sweep should remove rust stains with a high-powered water sprayer and a specially formulated cleaning solution like ChimneySaver Brick and Mortar Cleaner. This non-corrosive solution doesn’t contain muriatic acid, which would accelerate damage to masonry materials.
If you notice rust in the flue liner or any other masonry component, it’s time to call for a chimney inspection and cleaning. A corroded chimney flue liner will lead to a faster buildup of creosote and increased risk of a chimney fire. It’s also a sign that your chimney isn’t effectively protecting your home from carbon monoxide poisoning.
The best way to protect against rust is to replace any rusted chimney components with stainless steel ones, which have an added protective layer of chromium that’s resistant to corrosion. This includes the chimney cap and flashing, which is a key point where water leaks into the masonry materials of your chimney. A stainless steel chimney cap and a top sealing damper like the LockTop system not only keeps birds, animals, and other critters out of your fireplace but also seals off your chimney at the top, keeping cold air out and warm air in when the chimney isn’t in use. These systems are also much easier to maintain than traditional clay flue tiles and can help extend the life of your chimney.
Spalling
Brick spalling is a serious condition where crumbling, flaking, or chipping bricks are causing deterioration to the surface of your chimney structure. When left untreated, spalling can lead to serious structural damage that compromises the safety and integrity of your chimney. Typically, spalling is the result of water intrusion, which causes the masonry to erode over time. It starts as a minor problem and can quickly turn into a big issue that requires professional repair to avoid further damage to your chimney and living spaces in your home.
Chimney Solutions professionals use a number of different methods to repair spalling bricks and ensure it does not recur. The first step is to fully assess the extent of the deterioration by carefully inspecting the bricks, mortar joints, and other areas of your chimney. The inspector will also evaluate the structural stability of your chimney to determine if it is leaning or has other signs of movement that could indicate deeper problems.
Moisture is one of the biggest causes of spalling, so the inspector will also look for any areas where moisture is leaking into your chimney. This includes the area between the chimney flue and chimney crown, which is where gaps often form after years of exposure to wet weather conditions. This area can allow water to flow down the inside of your chimney and cause other health and safety concerns like mold outbreaks in your home.
Once the inspector has a complete understanding of the extent of your spalling bricks, he or she will recommend the appropriate steps for repair. In many cases, the bricks can be repaired with a process called tuckpointing, which uses mortar that is expertly color-matched to your chimney’s unaffected areas. The repair can be a quick, affordable, and effective solution to your chimney spalling.
Signs It’s Time to Hire a Plumber
Plumbers Topeka work on plumbing systems in homes and buildings. They collaborate with construction teams to ensure that plumbing is integrated seamlessly into building projects and meets all relevant regulations.

Customer service skills are important for plumbers, who often work with clients to understand their concerns and provide advice. They must also be able to solve problems quickly and efficiently.
Leaky faucets are one of the most common plumbing problems and often cause water waste. However, if left unattended, leaks can also lead to costly water damage. Homeowners can prevent leaky faucets by regularly cleaning their faucets and checking for loose parts. A small part like a washer or O-ring that wears out can cause a leaky faucet. Replacing these small parts as soon as they wear out can prevent expensive leaky faucet repairs.
Before attempting any leaky faucet repairs, homeowners should always turn off the water supply to the leaking faucet. This will prevent any uncontrollable spraying of water from the faucet while you are attempting to work with it. Next, they should dry up the faucet and the surrounding area of the sink to prevent water damage.
Attempting to repair a leaky faucet without turning off the water supply can result in flooding your bathroom and potentially other rooms of your home. It is also very dangerous to work with small parts while the water is still flowing.
Once the water is off, a homeowner should first use a screwdriver to remove the handle screw. This will expose a hex-key wrench that can be used to loosen the faucet handle and pull it off. Then, a plumber should use a wrench to loosen the packing nut which is holding the stem in place. Once the stem is removed, the plumber can replace the washer and O-ring. It is important that the new O-ring be coated in plumber’s grease to prevent it from leaking.
The next step is to remove the cartridge or ceramic-disk valve if your leaky faucet is a cartridge style. Once the old cartridge or ceramic disk is removed, the plumber can inspect the O-rings and seat washer to ensure they are in good condition and are not the source of the leak. Then, a plumber can replace the worn out O-rings or cartridge.
If a leaky faucet is not fixed after a plumber has replaced the washer, O-ring, and valve seat, then another problem may be present. These other issues include corrosion in the valve seat area, loose parts, or broken plumbing.
Broken Faucets
Faucets are one of the hardest-working fixtures in your home, and they get a lot of wear and tear. If you’re constantly dealing with broken faucets, it may be time to hire a plumber for repairs or replace your fixtures altogether. Here are a few signs it’s time to call a plumber:
If the water from your faucet is discolored or tastes bad, it could indicate that there are rust particles in the pipes. Rust can also cause the piping to break down, leading to other problems like leaky faucets. A plumber will inspect your pipes to determine the source of the problem and complete a plumbing repair or replacement as necessary.
A dripping faucet wastes water and can drive up your utility bill. The good news is that most faucet leaks can be fixed by tightening loose screws or other small adjustments. However, if the leak is caused by a faulty valve stem or cartridge, you’ll need to remove and disassemble the entire faucet and clean the parts with a mineral-removal product.
The handle stem in your faucet can develop pinhole leaks if it’s worn out, especially if the nut that secures it isn’t tight enough. This can lead to leaking from the spout, so it’s important to replace the stem if this is the case. To do this, you’ll need a wrench, screwdriver, and replacement parts. Depending on the type of faucet you have, the O-ring may need to be replaced as well. It’s a good idea to bring the old O-ring with you to a hardware store to ensure you get the right size. You can also purchase O-rings online or at some plumbing supply specialists.
Before you begin a repair or disassemble your faucet, make sure the water is turned off. Look for the fixture shutoff valves underneath your sink and turn them clockwise. This will prevent any unexpected water from flooding your home while you’re working on the faucet. It’s also a good idea to cover the drain to avoid losing any small parts down the sink drain.
Faulty Faucets
Sometimes a slow drip isn’t just annoying, it can signal a serious problem with your faucet system that needs professional attention. This can include issues with the pipes, valves, or even the sink itself. A plumber can help with all of these problems and others that aren’t related to the faucet itself.
When a faucet isn’t giving off water, it might mean that the stem or cartridge has worn out and needs to be replaced. This type of repair is fairly simple for a plumber to perform and can save you money in the long run.
Another common cause of a non-functioning faucet is mineral buildup in the valve seat and stem. This can be prevented by regularly cleaning the stem and valve with a mineral remover. This should be done before the handle starts to become difficult or impossible to turn.
A faulty faucet can also be caused by damage to the small copper tubes that run through the base of the faucet. This is a much larger problem that will need to be fixed by a plumber.
If you are experiencing a faucet leak, it might be time to call a plumber in Paso Robles to come and fix it. If the leak is coming from the faucet base, it means the seals in that area have worn out. This is not something that can be repaired and will need to be replaced.
A leaking faucet can also be the result of loose screws. If this is the case, it’s a good idea to tighten all of the screws on the faucet first and move on to other remedies only if the leak doesn’t stop. This includes the adjusting ring on a ball-type faucet. You should also make sure that any replacement parts are an exact match for your existing ones. Otherwise, they might not fit correctly and may result in leaks elsewhere in the faucet setup. This also applies to the washers and O-rings. When you are replacing these, look for a kit that mentions your specific faucet brand and model on it.
Faucet Repair
Faucets are often used and subject to regular wear and tear, which can cause them to break down or leak. Fortunately, many faucet problems are easy to fix. A quick trip to the hardware store can usually find a replacement part that will get the job done. For more serious issues, it may be necessary to replace the entire faucet.
Some common problems include broken seals, loose parts and corrosion in the valve seat or spout. These are typically easy to fix, but it is important to shut off the water supply before working on a faucet. It is also a good idea to keep a few tools on hand when working on a faucet, such as a screwdriver and penetrating oil.
Most leaks occur near the spout of a faucet and are caused by worn O-rings or the valve seat. O-rings can be easily replaced, but it is a good idea to bring the old one with you to the hardware store to make sure that you are purchasing the right replacement. The valve seat can be corroded by mineral deposits or sediment, which can cause the faucet to drip. If the valve seat is leaking, it can usually be fixed by replacing the washer or a rubber seat seal.
Another problem is broken or corroded washers, which can cause the cartridge to leak. The washer is located under the seat and can be replaced by removing the stem cap and using a screwdriver to remove the old washer. A new washer should be inserted into place, and it is a good idea to coat the new washer with plumber’s grease.
Disc cartridge faucets have two rubber seats and springs that can be replaced. First, remove the handle cap and decorative knobs by prying them off with a flathead screwdriver. Next, unscrew the handle screw or use a wrench to loosen the packing nut. After removing the stem retaining nut and washer, remove the cartridge and replace the washer and seat. Be sure to coat the new washer and O-ring with plumber’s grease before reassembling.
Roof Installation Expert
Roofers West Chester PA protect buildings, walls, swimming pools and tanks against water damage by applying coatings. They are also responsible for damp-proofing surfaces and repairing rotten joists.
They often work on residential homes and commercial structures, as well as construction sites. The job involves risky work, but roofers receive training to mitigate hazards.

A Roofer professionally builds, inspects, repairs and replaces roofing structures for residential or commercial buildings. They also install shingles, tiles and metal roofs. They also perform maintenance on rooftops and repair faulty gutter systems. They use a wide range of tools and materials, including hand and power tools. They must also be able to read blueprints and diagrams.
Roofers often work in teams, collaborating with other construction professionals to coordinate tasks. Good communication skills are important for maintaining positive relationships with clients and other contractors. They may also need to explain roofing materials, techniques and maintenance requirements to clients.
They also have to prepare work areas and complete safety training, e.g. how to use safety harnesses and other equipment. They must also be comfortable working at heights and in extreme weather conditions.
Some roofers specialize in specific types of roofing. For example, shinglers (a sub-type of roofer) specialize in the installation and repair of asphalt or fiberglass shingles. They must be skilled in aligning and attaching shingles properly to create a watertight and aesthetically pleasing roof.
Roofers monitor the entire roofing process in both residential and commercial construction, ensuring that all roofing work is done in strict accordance with the project’s design. They also determine the types of materials, substrates and supportive accessories that will be used for roof installations. They also re-slate and tile roofs, fit skylight windows and replace lead sheeting and cladding.
Other duties include repairing damaged shingles and flashing, sealing leaks and identifying signs of wear and tear. They also inspect and repair damaged joists. They usually work on existing buildings, although some roofers also build new roofs as part of a building construction team.
In addition to their technical skills, roofers must be highly adaptable and able to work under tight deadlines. They must be able to cope with changing weather conditions and unexpected site issues.
Roofers typically work a standard 40-hour week, but may be required to work overtime during peak periods. They must be comfortable working in extreme weather conditions and with a variety of hazardous materials, including hot bitumen. They must wear protective clothing, including long sleeved shirts and thick pants to protect their skin from cuts, scrapes and burns. They must also wear hard hats and eye protection, and work boots to provide good traction on uneven or slippery surfaces.
Education and Training Requirements
A roof is a vital part of a building and keeps everything inside protected and dry. However, it deteriorates faster than other parts of a building and needs to be repaired or replaced. This creates the demand for skilled Roofers. This job requires physical fitness, hand-eye coordination, and the ability to understand technical plans. There are various routes to becoming a roofing operative, including going to trade school, working through an apprenticeship, or learning the skills on the job. Regardless of the route, employers are looking for enthusiastic, hardworking and willing to learn professionals.
Most Roofers receive on-the-job training, with some completing three-year apprenticeship programs. Those who don’t complete an apprenticeship usually start as helpers and work their way up, performing tasks like carrying equipment and materials and erecting scaffolding. Eventually, they’re able to do more complex roofing work, such as laying asphalt or fiberglass shingles.
There are no formal education requirements for a Roofer, although high school classes in maths and shop can be helpful. Since Roofers must measure the size of a roof and calculate the amount of materials required, they need to have good quantitative skills. They also need to be able to follow instructions, so it’s important that they have a high level of attention to detail. Working on a roof can be hazardous, so Roofers must have excellent safety knowledge and use the appropriate equipment to minimize risks. They must also be able to work in harsh weather conditions, such as rain or snow.
Salary
A Roofer salary can vary based on the experience and expertise of the individual. It can also be influenced by the cost of living in the area where the job is located.
It is important for a person interested in becoming a Roofer to understand the average wages in the area they are considering working. This can help them make the best decision about whether this is the right career for them.
In the United States, the average salary for a Roofer is $54,825 per year. This is equivalent to $26 per hour. It is possible for people in this career to increase their earnings by earning additional qualifications or working for a different employer.
Many people who are interested in becoming a Roofer can find jobs in their local area. However, there are also many other opportunities in places across the country. It is a good idea for someone who is looking to become a Roofer to compare the salaries in various locations before making a decision.
It is also important for people interested in this profession to know the risks involved with this type of work. It is possible for people to be injured while on the job, but there are ways to minimize the risk. This includes ensuring that all safety regulations are followed, and it is a good idea for individuals to take part in any training that may be offered by their employer.
A Roofer can find work in both the commercial and residential fields. They can find positions that focus on either repairs or installation of new roofing materials. This can be done on buildings of all types, including private homes and commercial structures.
The extent of the damage will have a significant impact on the cost of the repair. For example, a full replacement of the chimney pipe boot with adjacent shingles will lean towards the higher end of the repair price scale. The cost of the materials will also play a role. Choosing specialized or high-quality materials can increase the cost.
Another factor that influences the cost of a repair is the complexity of the work involved. Working on steeper or more challenging roofs requires additional safety measures and labor costs, which will affect the estimate.
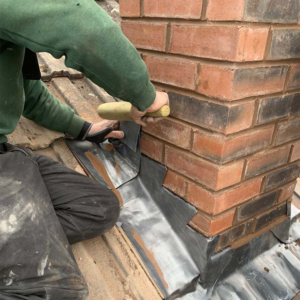
To perform a repair, the roofer must first remove any shingle adjacent to the damaged area. This must be done with precision to avoid damaging unaffected shingles. Next, the flashing must be removed. This involves carefully cutting and bending the metal to fit around the affected area. It’s then fixed to the sheathing and shingles using either nails or sealant.
Lastly, the shingle must be re-installed around the flashing and secured. Once everything is in place, the roofer can apply a layer of sealant to ensure a watertight seal.
To complete the process, a roofer must inspect the interior of the roof to identify any underlying issues. This will usually involve getting up in the attic or crawlspace and taking high-resolution pictures. These should be able to clearly show any damp spots, which are a red flag for water penetration and/or structural damage.